Friday 27 July 2018

Friends layout for Tres Jolie

Hello all, 

It's my last project of the month using the Tres Jolie July kit. 

I have really enjoyed creating with this kit, I hope you have enjoyed seeing all the designs created by our DT.

My layout this time is based around a central design. It is a simple layout using a texture base stencilled background and some embellishments framing the photo.


I used one of the plain dotty papers for a background paper. 


My focal background paper I trimmed 1cm off on two sides to reduce it enough in size to see a border of the dotty paper when it is mounted on it.
I punched the edge in random places around the paper and then distressed the edges.


I chose a lovely flourish stencil (not sure of the brand of this one from my stash) and designed the stencilling so that when I add the central design some of the stencilling will show out from under the edges.


My photo is layered on a neutral patterned paper with the doilies and overlapped on the chipboard piece that has been heat embossed with a white embossing powder.

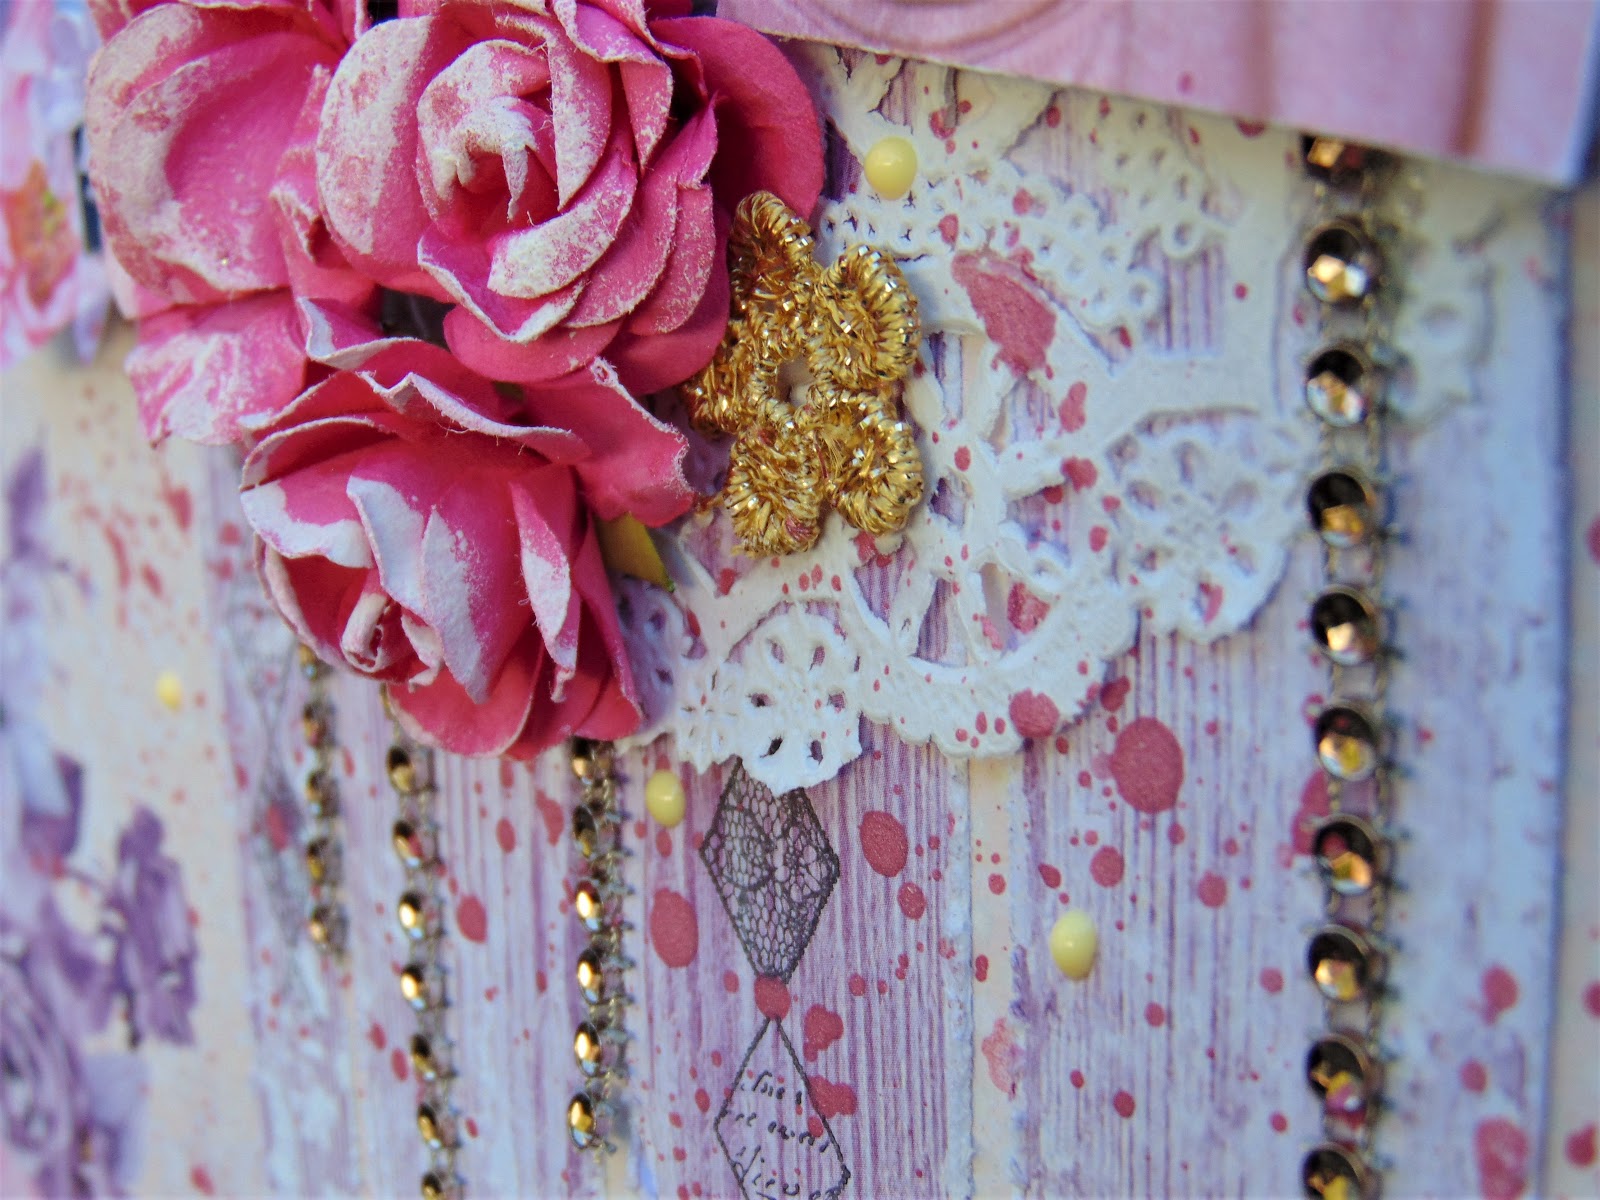
I then added the flowers, leaves, badges, some metals and Nuvo drops around the layout to finish it.


Here are some close ups of the finished layout.


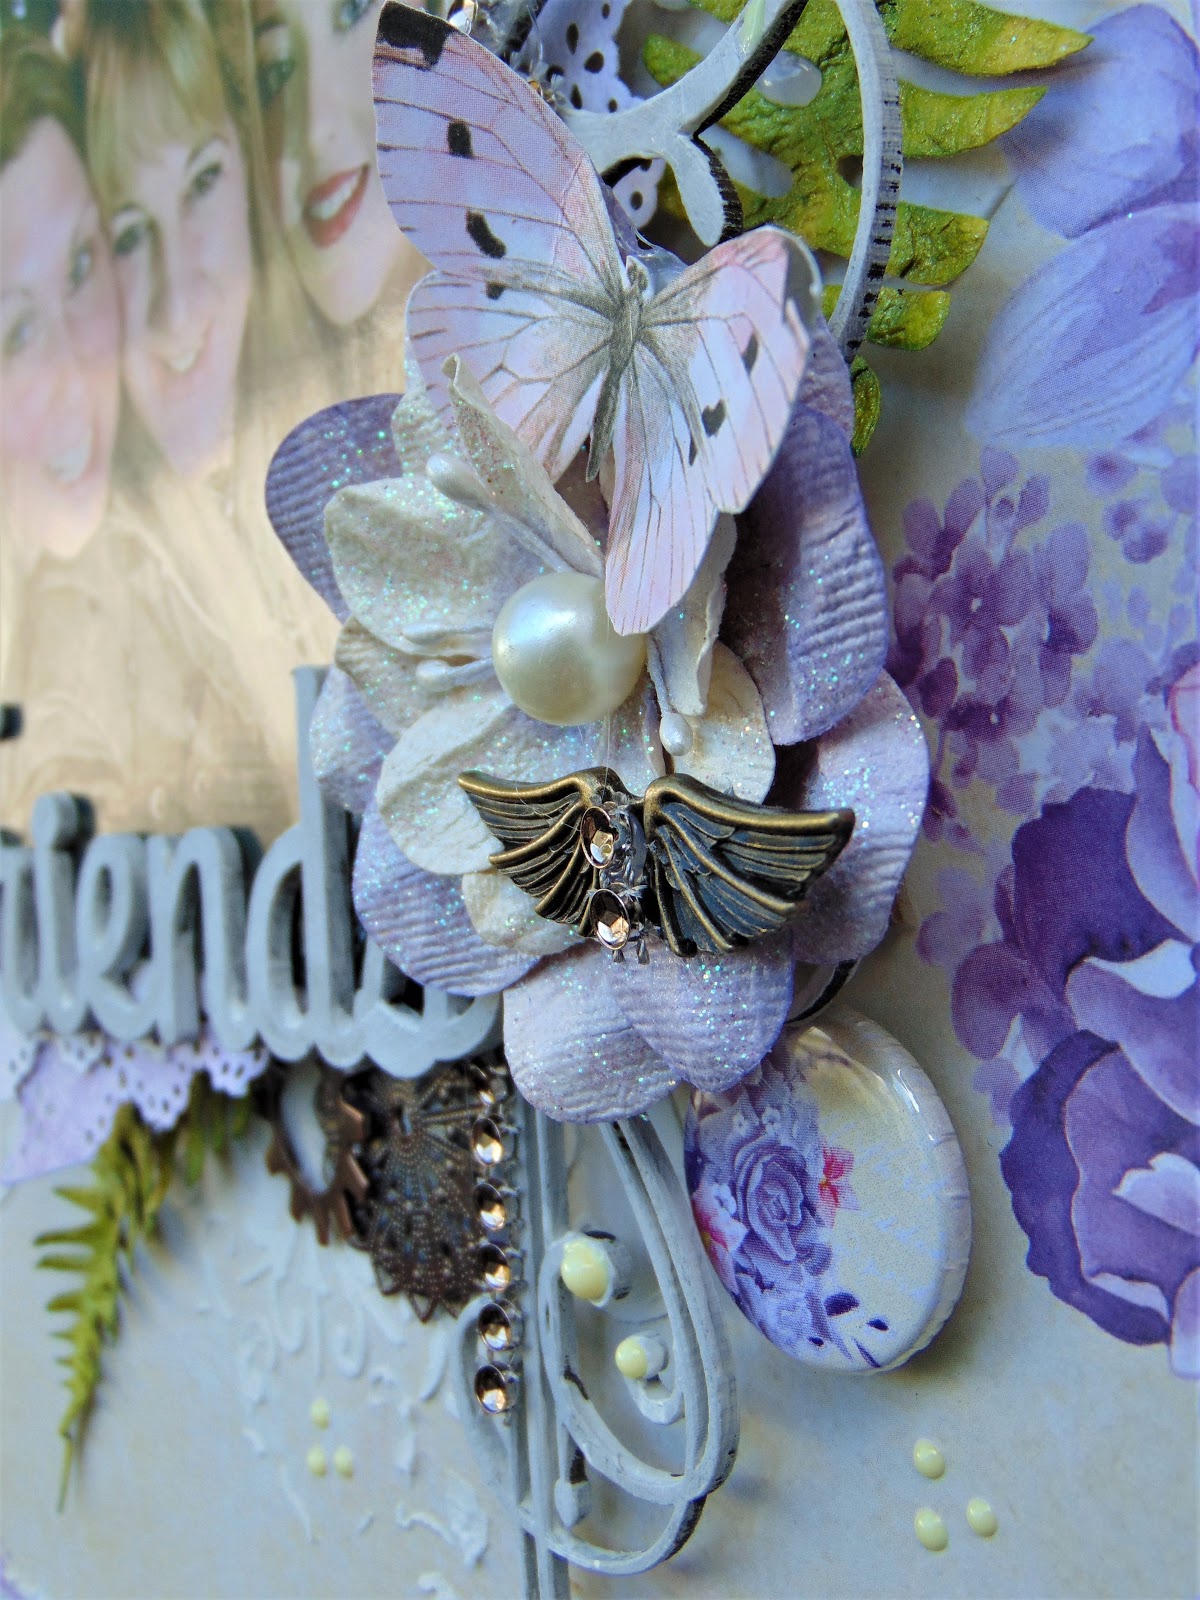
I again used some fussy cut butterflies cut from that gorgeous paper full of them!


The title was a chippie from my stash but was perfect for this layout so I had to use it. It is just simply covered with a couple coats of white gesso.


Everything on this layout is from the July Scrapbook Kit except the metal cogs (which are from the Mixed Media Kit) and the chippy title. The texture paste is from the June Mixed Media kit.


If you are interested in finding out more about subscribing to any of the kits from Tres Jolie then follow the link below. Dont forget we have available every month a....

* Scrapbook Kit
* Mixed Media Kit 
*Card Kit

You can subscribe to one, two or all of them!


You can find Tres Jolie in the following places:


Tres Jolie Website  http://tresjoliekits.com/


Happy Scrapping!

Ginny  :)


Friday 20 July 2018

Fussy Cut Layout fro Tres Jolie Kit Club

Hello all,

 I'm back with a layout made with the Tres Jolie July Kit.

This one I think is my favourite one from this kit that I have created this month. 
I did some fussy cutting from the beautiful Lemoncraft papers to create layers and detail on this page...


 I used 2 identical photos on this layout. One I kept whole and the other I cut in half! Shock horror!
The cut one I layered either side of the whole, slightly offsetting it. 


These papers from Lemoncraft were perfect for fussy cutting! I cut out two large flower clusters and used these either side of my photos. 
The photos and these two layers are set up of the page using cardboard but you could use foam pads.
I do like a little dimension to my pages. Lifting layers off the page also allows you to slot embellishments under layers to soften edges and create a real 3d effect.


You dont need to use too many embellishments to create a pretty and lovely looking layout. This layout doesn't really have much on it but with the choice of papers and the fussy cutting it looks a full and covered page.


I used the doily under the photos as another layer and added some stamping with a stamp from my collection to add extra detail, another feature with out having to use an embellishment, so if your near the end of your kit and struggling for embellishments, remember things like stamping to fill a layout out.


I did some pink splattering in the background using the pink PearlEx mixed with water and a paint brush, I cut the some little flowers out of the beautiful gold lace and stuck them around the layout too! 


Im a real fan of the NuvoCrystal drops and all the lovely colours they come in. The one in the kit is called Buttermilk. I used the Nuvo around the layout with the odd drop here and there!
The crystal drops are from my stash but just thought they added a beautiful effect to the design and gave it a bit of extra bling. You can never have too much bling!!!!!


If your interested in receiving Tres Jolie Kits then please follow the link below for more details.


Here are the kits available:

Scrapbook Kit

Mixed Media Kit 

Card Kit


Tres Jolie can be found on the following social media sites:


Tres Jolie Website  http://tresjoliekits.com/

Tres Jolie Blog  http://tresjoliekits.com/


Thank you for stopping by today

Hope you re enjoying all the projects created by the DT.

Ginny  :)


Friday 13 July 2018

Gold Layout for Tres Jolie

It's Friday again... and I'm back with another layout for you from the gorgeous July kit from Tres Jolie Kits.

I have used the natural cream colours in the kit on this layout highlighted with the gold..... have you seen that gold lace in the kit yet? It's gorgeous!!

Here is the layout


I have some photos for you of my process in creating this layout.
So lets get on and show you.


Start off by choosing a background paper and a feature paper. Cut the second paper to make a border down the middle. Distress the edges and ink all edges on both papers. Stick 2nd paper down the middle, mine is slightly offset from the middle.


Cut a strip of the GORGEOUS gold lace and stick down overlapping the left hand edge of paper 2.


Next choose a stencil and using white texture paste spread in patches over the layout where you ant the stencilling to show. 


So you end up with something like this.


Fit the chosen photo on the back of the biggest shabby white frame.
And hot glue onto the layout.


I love this butterfly sheet.... cut out 3 butterflies of choice.


I used the beige flowers from the kit and started to arrange on the layout with the butterflies.
The smaller shabby frame I glued to the lower right side of the design to balance it.


I had some Viva Inka Gold in my stash which using my finger I have rubbed over the higher parts of the pattern on the shabby frames. 


 I then used a stamp from my stash and some Toffee Versafine ink....


….. and stamped down the edge  of paper 2.
 I added some Nuvo in groups of 3 drops.....


…… and dropped some microsphere beads into it whilst it was still wet to create berries.


I then stamped some flourishes from a stamp out of my stash . Using stamps is a great way to create extra embellishments or even just embellishments in a colour to fit in with what you are creating. They help to fill out a design or add an extra feature.


Fussy cut the flourishes out.


Add them to the flower clusters on the layout.


I also stamped a title verse and fussy cut that out and added to the layout.

And  voila!!


I love the neutral colour tones to this layout from a very predominate purple kit! 

Hope you like it too!


Here are some close ups....


Products Used on this layout:

From July Scrapbook Kit

* Lemoncraft : Violet Silence paper collection
* Gold Lace
* Prima: Shabby Chic Treasures: Resins: #892098
* 49 & Market: Flowers: Shimmer & Shine Ivory Jardin Secret
* Nuvo Crystal Drops: Buttermilk

Other products used

* Ranger: TexturePaste; Opaque Matte (previous kit)
* Versafine Archival ink; Toffee
* Prima Cling Stamps
* 13 Arts Microspheres brown (previous kit)
* Viva Inka Gold


Tres Jolie can be found on the following social media sites


Here is what you get in the Scrapbook Kit for July.
If you are interested in getting these kits then follow the link below for more information


Thank you for stopping by today, 

Happy scrapping ! 

Ginny  :)


Sunday 8 July 2018

Mixed Media Kit Canvas


Hello All,

I'm back with you today, this time with the Mixed Media kit from Tres Jolie Kits.
These mixed media kits are fantastic, within the kit is a whole project to complete from start to finish, all the 'mucky' products (as I like to call all the paints and mediums lol) and the final embellishments to create your own masterpiece!

This months kit included a paint brush!
It has been great seeing what the other DT members came up with as you will find out!
And I'm looking forward to seeing photos of what you guys create too!

I used the paint brush and the embellishments to create a canvas.

Here it is...


The kit came with a boxed set of Mixed Media essentials from Finnabair Art Basics range.
These included clear gesso, black and white gesso in 2FL.OZ tubes, a good amount of each.
I have used the clear and the white on this project.


The canvas had a base coat of the clear gesso over it before anything else and then a coat of white gesso to create a good background.
Next I used a doily stencil from Prima with some Texture paste ( from last months mixed media kit)
and 4 doily patterns over the canvas overlapping it off the edges of the canvas.


Next came the fun part with the PearlEx colours. We had 3 gorgeous colours in the kit and the Gum Arabic. The Gum Arabic is a binder medium, mixed with the PearlEx and water it creates transparent water colours. It says on the pot to mix 1 part gum to 4 parts pigment (PearlEx) this creates a strong colour, I used a little less pigment to get a slightly softer colour. 

Generally play around with amounts and strengths to get the colour and consistency that you want.
Over the spoon I used the gum and PearlEx but with not much water to get a thick consistency to sit in my spoon, the colour is stronger that way too.

I used the mixed watercolours over my canvas with a paint brush, one at a time allowing for some drying and using the palest colour first, building up a blended multi tonal effect. 


When dry I added another layer of white texture paste with a different stencil. This stood out nicely then against the coloured background.


Next step is to choose your main embellishments. Mine obviously is the paint brush but also I wanted to include the gorgeous little light bulbs and the spoon!
These I have all stuck on the canvas with a soft gel medium. I find this sticks anything to a canvas really well. Allow time for it stick completely but you can still work on it whilst it is drying.

Stick the brush to the canvas with the gel medium. Paint over the brush with the white gesso and allow to dry. I then used the watercolours again on the brush running them down from the top of the brush to get a dripped effect. 
When dry stick the spoon to the brush.


I used some of the Finnabair Mechanicals on the background too. Again these are stuck on with gel medium and then painted over with white gesso and the watercolours. I layered one up using the middle cut section of a doily from the main kit underneath it.


On top of the water coloured mechanicals I stuck the pretty little light bulbs ( I love these!)
At this point I switched to my hot glue gun to stick these embellishments. I set the bulbs on top of the Finnabair Mechanicals Wings and then decorated with flowers.


To finish the embellishment clusters off I did add some very pretty glass beads from my stash and a chippie word title painted in gesso and some pearls.


I used a sponge applicator to dab the tops of my flowers with white gesso and flicked some of the watercolours over the canvas to get a nice splattered effect.


I added some small detail with the microspheres from last months MM kit.
That's the nice thing about these kits, you end up with a great stash of products which can then be used on future projects too.


The PearlEx in the spoon has been added over some soft mat gel just to make sure the thicker PearlEx solution did stick and stay where I wanted it too.


Project like these are so easy because really anything goes. There is no right or wrong way and each piece created is unique and individual to the person and creation. Just have fun, be brave and go with the flow and experiment. You cant go wrong! 

Here is what you get in the Mixed Media Kit for July.
If you are interested in getting these kits then follow the link below for more information


You can find Tres Jolie on the following social media sites.


Hope you have enjoyed looking at my project today. 

Any questions please get in touch with us either here in the comments feed or on the Tres Jolie Club Café page and we will all be pleased to help you!

Ginny  :)