Monday, 15 May 2017

*** CSI- color stories inspiration, Case File 230 ***

  • YAY!
  • It's time for a new case file!!!


And what a gorgeous one it is - I LOVED this one!!

So lets show you our CSI - Color Stories Inspiration mid month case file board.


Gorgeous, right?!

Here is my layout.


Here's how I solve the Case File


* All 5 colours were used;


EVIDENCE USED:

* Watercolour
* Flowers/plants
* Butterflies
* Rhinestones
* Wood


MY TESTIMONY:

* Topic: Journal about a group gathering

* Presentation: Tuck your journaling into a layered embellishment (My journaling is rolled up in a lace roll and tie with a ribbon nestled in my embellishment cluster)


As soon as I saw this case file I knew which photos I wanted to use. I had to find a way to make the 2 photos I had work in the layout. Each photo had parts to it that wouldn't have fitted in, so I decided to fussy cut the photos and this thought then led to a mixed media layout!
The next step was the papers, after a browse through my loose papers I found this paper by Basic Grey and had that 'yes this is it' moment!


This photo shows the paper clay flowers and maple leaves created with the moulds.
The flowers were made with white paper clay and then painted them with the Wimberry Pie Acrylic paint and some liquid pearl for the centre. The flowers were made with the coloured paper clays, mixing a tiny piece of blue with the yellow to get the soft green colour. These then a brush of the 'White Noise' metallic to give them a soft sheen.
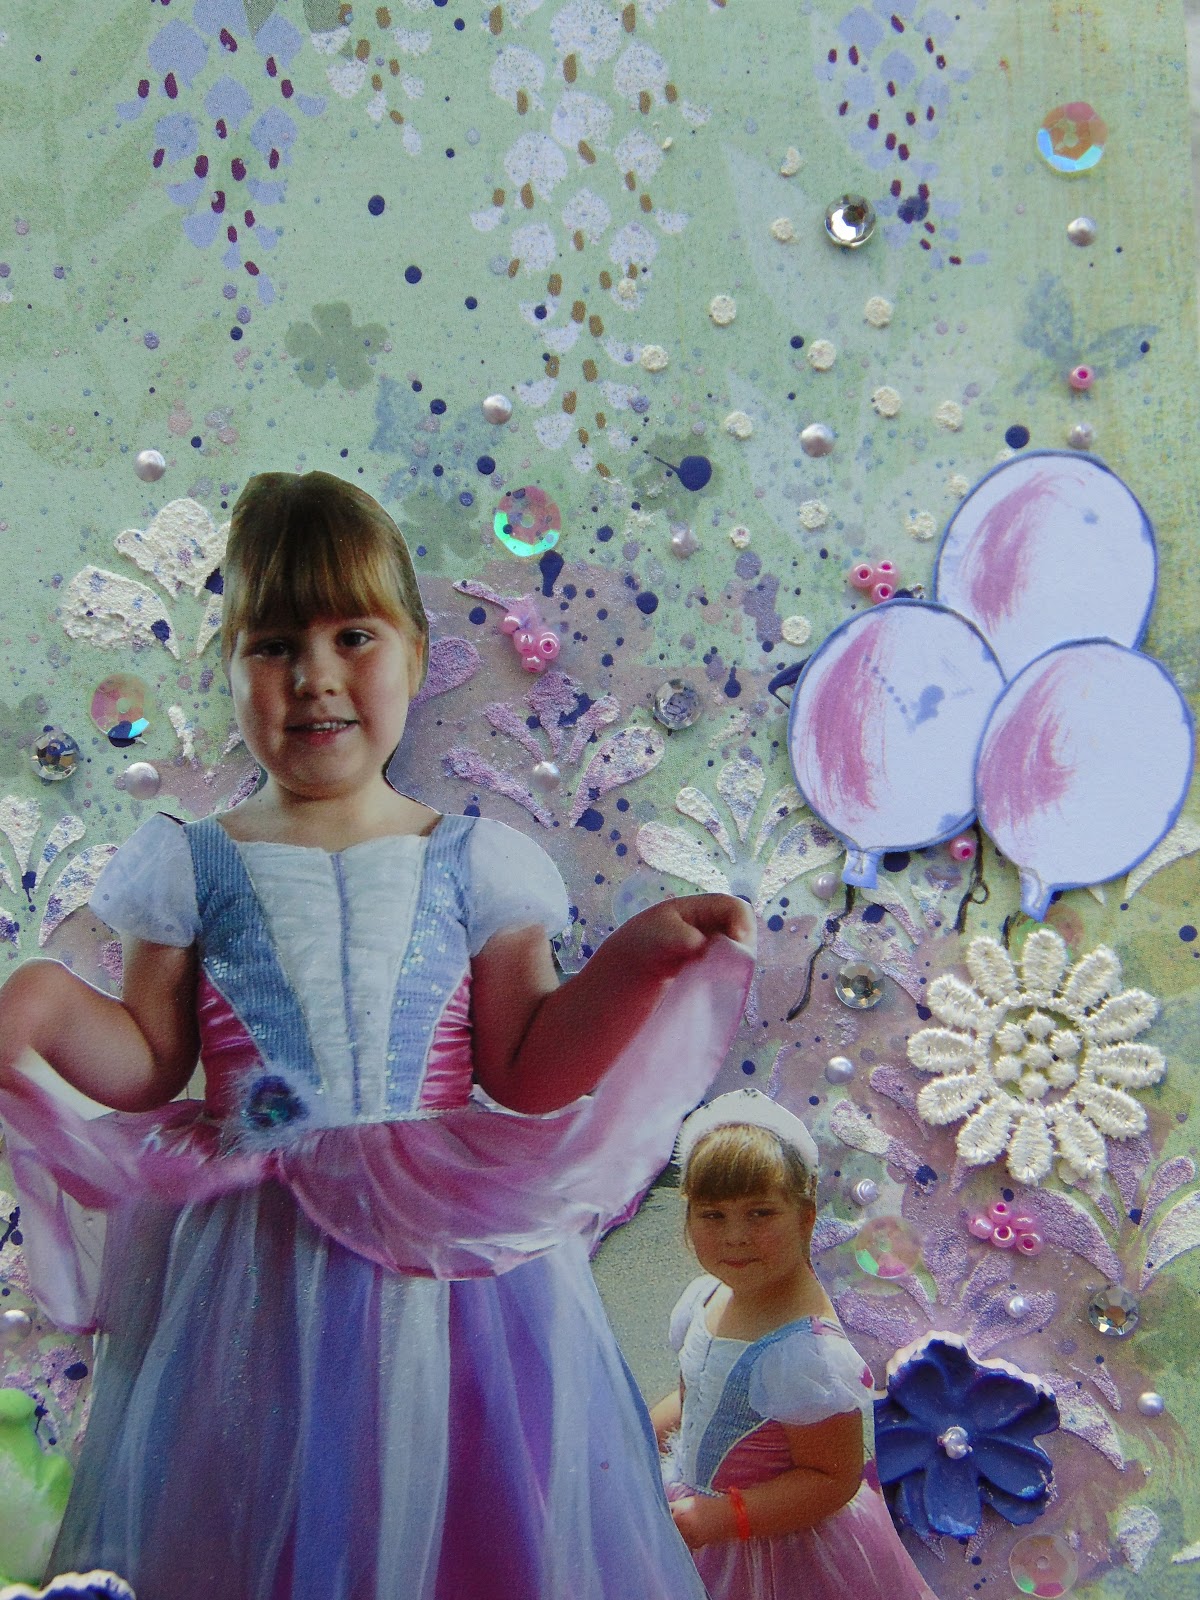

On my mixed media background I used two stencils with the grit paste, splashes of gesso and the Wimberry Pie paint. I then used 2 colours from the Metallic set ( Ultra violet/ blue aura) mixed together to get the colour as near as I could to the scheme colour, to wash and splatter over the 2 background areas of interest on my layout. I then used seed beads, sequins, lace flowers and rhinestones with gel medium, and to add further interest I used some Card-io peg stamps, a butterfly and flower with grey staz on ink and shaded lilac ink to meet the colour and evidence brief.


The Chipboard title was simply painted with the Wimberry Pie paint. The gesso splatter that went on after just blends the word into the layout a little. I used a stamp and the shaded lilac ink to create the balloons on white cardstock and then fussy cut them out, and added the detail with the metallic again.
I added balloons because balloons were released as part of the celebrations as explained in my journaling.


I drew strings on my balloons with my Micron Pigma black pen.


My journaling is written on a piece of paper (inked edges) which I then added a lovely piece of lace to the outside. This was then rolled up with the lace on the outside with a ribbon to tie around it to keep it rolled up. This was then glued into my embellishment cluster making sure it was glued so that the roll would still unravel to be read, as you can see in the next photo!


My journaling reads:
' Holly's last year at Sticky Fingers nursery she had the lead role in their end of year paly. She played the role of the princess in 'The Princess and the Pea'. Her prince was **Smith. we bought her this amazing dress as her 'rags to riches' dress to change into when she became the princess. She looked stunning in it. It was an amazing play and we were so proud of her! Afterwards we all went outside and released lots of balloons into the summer sky to celebrate one of the staff members on their last day - July 2013'


Products used on this layout:

* Basic Grey: Paper: Wisteria Gazebo
* Memory Box: stencil: Sprinkle Dot
* Prima Marketing: stencil:
* Tim Holtz: Distress Grit Paste
* Lace
* White card
* Indigo Blu: English Cottage Artists Acrylic Paint: Wimberry Pie
* Staz On: Ink: Dove Grey
* Tim Holtz: Distress Ink: Shaded Lilac
* Matte Gel
* Liquid Pearls: Lavender Lace
* Seed Beads: Pink
* Prima Marketing: Royal Menagerie: Chipboards & Mace: Sequins
* Martha Stewart: Silicone Moulds: Flowers
* Martha Stewart: Silicone Moulds: Leaves
* Martha Stewart: Paper Clay: White
* Lace Flowers
* Crystal Rhinestones
* Dusty Attic: Chipboard: Word Pack #4 DA10772
* Prima Marketing: Metallic Accents: Semi- watercolour cake: white noise
* Prima Marketing: Metallic Accents: semi- watercolour Cake: Ultra violet
* Prima Marketing: Metallic Accents: Semi-watercolour cake: Blue Aura
* Card-io stamps: Oriental Blossom Peg stamps
* Micron Pigma Black Pen


Thanks for stopping by today,

Don't forget to stop by the CSI blog to see what the other Design Team members came up with for this case file here   http://csichallenge.blogspot.co.uk/ 


Ginny  :)


Friday, 12 May 2017

Altered Shadow Box with Graphic 45

Hello all,


Today I'm sharing an altered art project with you all!

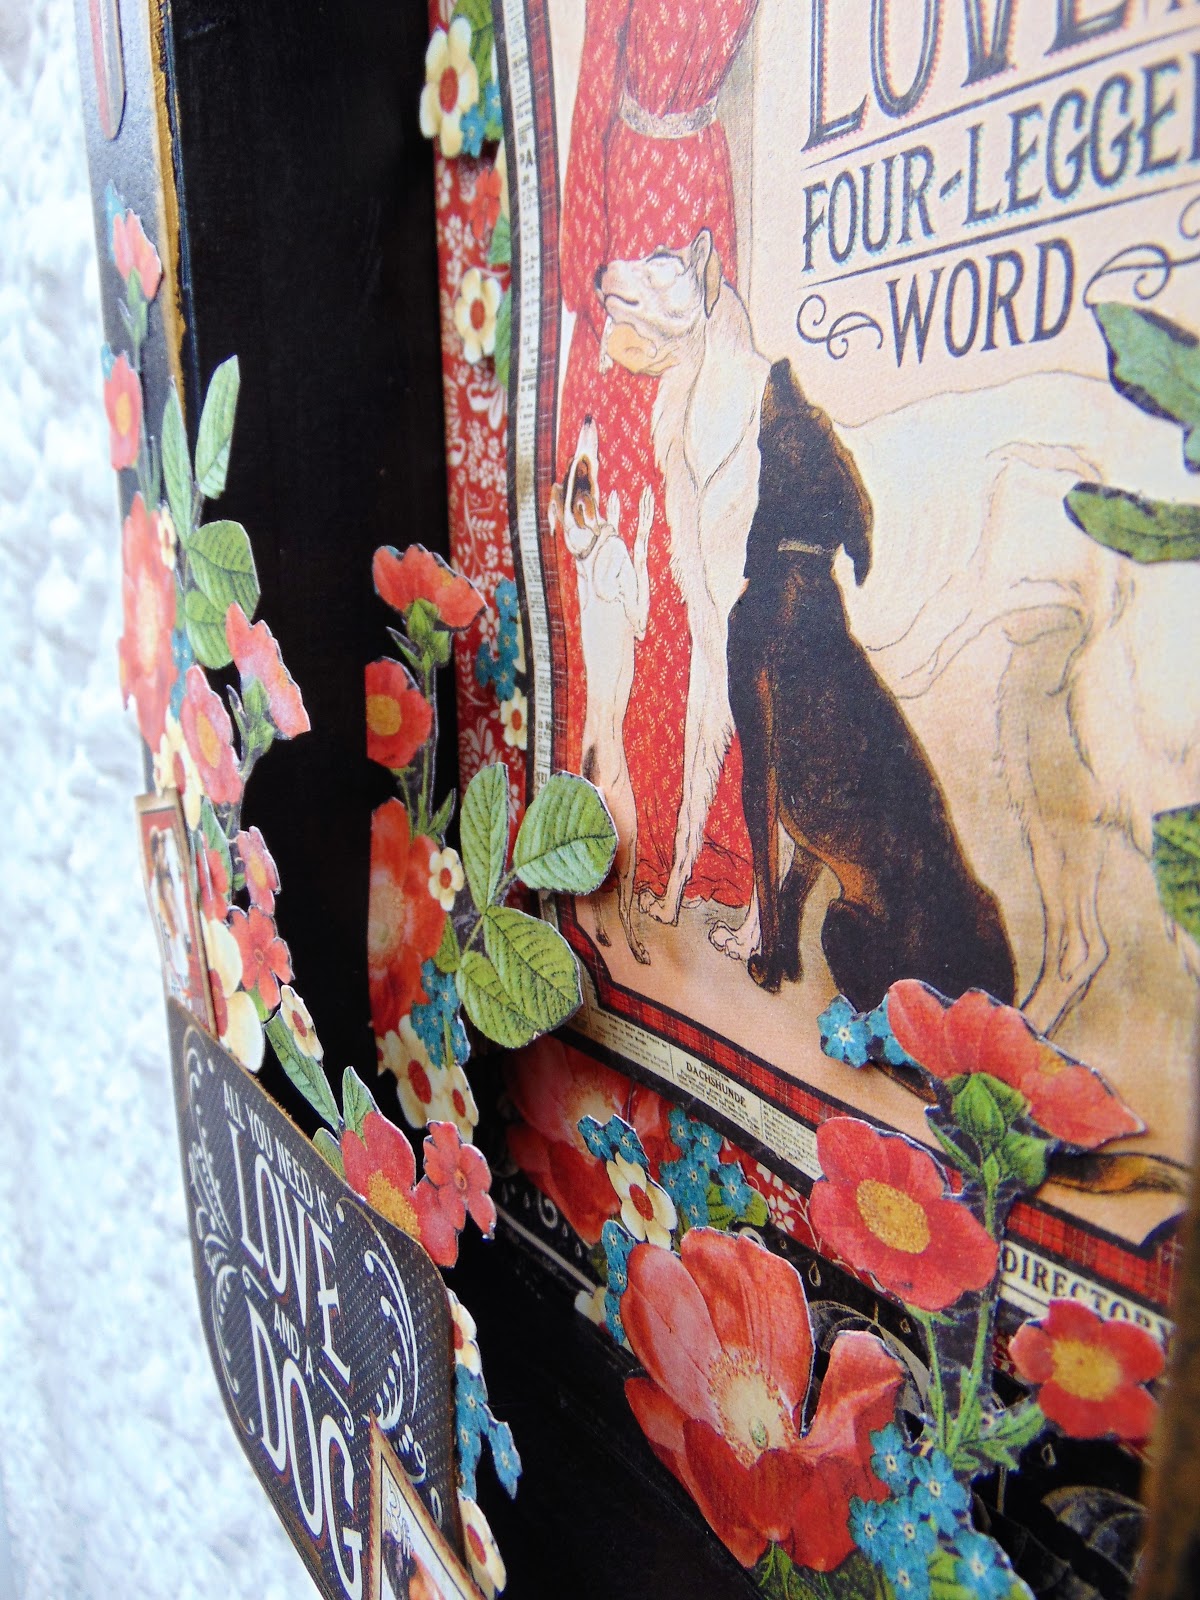
I have used a Shadowbox kit from Clare Charvill at My Creative Spirit
and altered it using Graphic 45 paper collection Raining Cats & Dogs.


After assembling the shadow box I painted it with some black acrylic paint, all over, inside and out.


When it was dry I rubbed Viva Inka Gold with my finger along all the edges, not neatly, I wanted it to have a shabby distressed antique look about it.


I started with the inside back of the box. I Covered this area with my choice of background paper and a couple of strips of a pattern border at the bottom and top. My main feature postcard the 'love is a 4 legged word' I popped up on foam pads and stuck to the back.


Then came loads and loads of fussy cutting! There is a beautiful paper in this collection which is full overload of flowers and leaves, I cut out the whole lot from the 12x12 paper!
All these fussy cut pieces I have added to the box gradually increasing the depth of the foam pads (some pads cut up so small to fit the small cut pieces) to create the 3d effect. I built the flowers up from the bottom to create the garden effect. I slipped some under the edge of the feature postcard and a little on top left edge.


On the outside front of the box my design was based around the red 'Home is where my dog is' banner at the top and the 'All you need is love and a dog' in the bottom left hand corner. These were stuck straight onto the box with a few fussy cut flowers slipped underneath and a fussy cut stamp added on top. I then glued fussy cut flowers around the top front edge and  glued some underneath the lip of the top front so they look like they are growing out from inside the box.


By gluing the fussy cut flowers so they overlap all the edges softens the look and adds to the 3d effect. It really makes you feel like you want to peer inside around the foliage to see what else is in there!


Products used on this project.

Clare Charvill 'My Creative Spirit': Shadowbox kit
Graphic 45: Raining Cats & Dogs: 12 x12 paper pad
Black acrylic paint
Viva: Inka Gold: Old Gold
Glue and foam pads


Thanks for stopping by today.

I hope you liked this project!


Ginny  :)


Wednesday, 10 May 2017

May Challenge Entries

Good evening all!


I so enjoyed doing my layout for the More than Words challenge last month I decided to enter this months challenge as well!
And this one is so up my street, the word inspiration is 'Mother' and then the theme is Flowers! What could be more perfect then that for a flower loving girl like me?!

I have also teamed this layout up with the Scrap The Girls Challenge also with the theme 'Mothers'.


Here's my layout


Here is the MTW challenge and link to the challenge post HERE


Here is the STG challenge and link to the challenge post HERE


Now for a little info on my creating!

My photo is of my Mum ❤ She is pictured here visiting a beautiful garden over the winter with the most amazing backdrop of plants and flowers. I rummaged through my patterned papers for the right papers and found these perfect papers from Kaisercraft called Treasured Moments. The forest green and deep raspberry colours matched the background colours of the photo so well.

Obviously it had to be flower overload, I have created this effect with fussy cut flowers and a selection of flowers from Wild Orchid crafts.
After that I had a bit of fun with some mixed media!


This Dusty Attic Chipboard flourish is two pieces layered up and then embossed with the magenta embossing powder. This powder is lovely, it has glitter pieces in it so is really sparkly but also when its heated bits of it go slightly white which gives a lovely effect. I have noticed this with other colours from the range, not sure if it happens from over heating or is meant to happen but either way I love it!  


The other piece of chipboard, the doily, I embossed most of it again with the magenta but left alternate parts of the pattern bare so when the chippie had been finished heat embossed and cooled I could glue the bare parts and add the Army Green glitter. The doily I then cut in half and used in two places on my layout. 


My edges were all distressed with my Prima distress tool.
I used two types of flowers from Wild Orchid crafts, these are paper flowers, the small Gypsophila comes in several different colours and these two pinky ones matched perfectly with my layout.


I spent a long tie fussy cutting the flowers, a little time consuming but worth it. I gives a great backdrop for the rest of the embellishments


I firstly designed the main area of my layout with the photo, photo layers and where my fussy cutting as going to go but not attaching it to the background paper. This gave me my design shape to work with for adding my mixed media background on my background paper. 
I used a wide dry paint brush to dry brush/smudge some gesso over the design area.   I then used the Distress grit paste to do my stencilling with. I love this stuff, its so easy to work with, gives a fabulous texture and it dries a lot quicker then normal texture paste.


After attaching the main design (I popped this up on some cardboard or use foam tape/pads) to the dried mixed media background and paper I slotted the doily chipboard into the two corners under the photo mount layers. then I built the rest of the design up on top with the flourish chipboard swirl and the flowers.
I added some gesso splats all over the layout then too.


Lastly I added some Frantage fragments mixed with some pink Art Sugar with some gel medium in a few areas around the layout.


The flowers I used on top and poke underneath my fussy cut layers to help create the depth to the layout. My fussy cut sentiment was inked with the Rose Bud chalk ink pad.


Products used on this layout


*  Kaisercraft: Treasured Moments: Memory (both sides)
* Kaisercraft: Treasured Moments: Wonder
Dusty Attic: Chipboard: Decorative Scroll #1 DA0213
Dusty Attic: Chipboard: Doily #5 DA0763
Wild Orchid Crafts: Flowers: Sweetheart Blossoms Ivory
Wild Orchid Crafts: Flowers: Gypsophila pink & wine
Stampendous: Frantage Fragments: Shabby Pink
Tim Holtz: Distress Grit Paste white
Memory Box Stencil:
Gesso white
Prima Chalk Ink Pad: Rose Bud
Blue fern Studios: Imagine Ink: Embossing Powder: Magenta
Blue Fern Studios: Imagine Ink: Glitter Army Dust
Prima Marketing: Art Ingredients: Art Sugar: Pale Pink


This photo is taken at an angle to show you the layers and how this creates the depth and interest  to the layout.


Thanks for stopping by my blog today and taking a look at my layout!

That's all for now!


Ginny  :)


Monday, 1 May 2017

***CSI Color Stories Inspiration Case File 229***

Hello everyone!

Today I'm sharing my DT layout for the latest, 1st of the month, Major Case File 229 for May at CSI Color Stories Inspiration!

And what a gorgeous colour palate we had to work with!


Here is the Major Case File  229


For those of you who maybe new to our CSI challenges here are a few pointers....

* all of the five colours ( the scheme ) have to form the basis to your layout and to be used somewhere on your layout, as little or as much of each colour as you want.
You can use/add neutrals (black, white, kraft, cream, grey, brown)
* You have to use at least 3 prompts from the 'Evidence' list.
* You have to choose at least 1 prompt from the 'Testimony' list for the inspiration for your journaling.
* the picture ( the scene ) is what sets the prompts for the 'Evidence list' so don't be frightened that your layout has to look like the scene picture, we are just using elements from the picture.

* Then enter your layout. You don't have to have a blog to put your layout on to enter. You can also upload a image of your layout to a public gallery like Instagram or Scrapbook.com and using the InLinkz link up on the side bar on the CSI blog, link it to your image.

* And then you could be in with a chance of winning a prize from one of these amazing companies who sponsor our challenges! Good Luck!


My Evidence used on this layout:

* Stripes
* Clouds
* Banners/ bunting
* Flowers
* Something Loopy
* word phrase stickers


My Testimony:

* Document something about Summer


All The Colours were used.


Now for some details and close ups.

As this is the first of the month case file, it comes with a sketch for your interpretation.
I only used one photo instead of the two but created the second 'photo space' with some of the 'clouds' paper and added some of my journaling in it.

I loved my papers I chose for this layout and kept the layout very 'clean' for me - no distressed edges, inking or Mixed media!


I threaded some bakers twine through the Sticker word set and stuck them on in a wavy fashion to be my 'something loopy', the 'Word Phrase Stickers' and the 'banners/bunting' from the evidence list.


My paper layers across the page I tore but in contrast all my other edges were clean cut. The Seashore crystals were the perfect colouring to match this colour scheme. The Memory Box die ribbon also classed as 'something loopy' in the evidence list.


My flowers were a mixture of Prima flowers and Paper Clay flowers made using moulds with yellow coloured clay. These were layered up with the die cut ribbons and the fabric covered button.


The 'stripes' from the evidence list was on my background paper. And the 'clouds' are on the blue background paper/banner.


For my testimony, I journalled about a summers day in 2010 when the kids were younger and we visited Pembroke castle. During the visit we went down to the river running underneath the castle and fed the swans, gulls and ducks. There were loads of swans and both the kids had  a wonderful time trying to feed them all.


Products used on this layout:


My Minds Eye: The sweetest Thing: Lavender "reasons why" Swatch
My Minds Eye: Good Day: sunshine: Head in the Clouds ( BOTH SIDES)
My Minds Eye: The Sweetest Thing: Lavender: the Best: Intricate 
My Minds Eye: The Sweetest Thing: Layered Stickers: Bluebell: Playful
Bakers Twine
Martha Stewart: Moulds: flowers
Martha Stewart Paper Clay: Yellow
Memory Box Die: Christmas Curled Ribbons
Prima Marketing: Flowers: Nikko Danno #582081
Prima Marketing: Seashore Crystals
Tiger: Stofknapper: Fabric Covered Buttons


Thank you for stopping by today, I hope you are inspired to come and have a go and enter with our CSI challenges. We look forward to seeing you!


Ginny  :) 


***Let's Get Sketchy May 1st challenge***

Hello all!

And welcome to the May 1st challenge at Let's Get Sketchy!

Let's get straight into it shall we?!

Here is my DT layout created with our fabulous sketch!


I LOVE these photos and I love that hat! :)


Here is the May 1st sketch......


And the extra twist for the May 1st challenge....

Create a layout with the Sketch PLUS Twist: USE YOUR STASH (dig through your stash and pull out those old kits and embellishments to create your work of art!)


This month's challenges are sponsored by LGS's sister blog Colorful Creations.


Now for the details and the close ups.....


So the twist was use your stash! All my materials on this layout I dug deep for in my stash!
The papers are an old line by Scrapberrys I have been hoarding but on this occasion with the flowers on the paper matching the photo so well I couldn't find an excuse not to use it!
I used the black print 'Dreams' paper as my strip down the side and my banner layers. The Glitz stripe paper was my photo mount paper.


I kept the main background of the layout the same but rotated the photo, mounts and banners 90 degrees.
I use a little mixed media with the mist and the texture paste stencilling.


My title I cut out using a Kaisercraft die in white cardstock and then inked the edges with the Prima chalk ink pad. The bakers twine in tied into bows and stuck into the flower cluster.


All my edges were distressed with my ever faithful prima distress tool! Couldn't live with out that!
The purple flowers in the photo I continued off the photo with these lovely purple fabric flowers I found in my stash and teamed them up with the pink paper roses and blossoms to match DD's very pretty hat!


The finishing touches were the adhesive pearls and the seed bead mix which I adhered with some gel medium.


Products used on this layout.

* Scrapberrys: Elegy Collection: Dreams
* Scrapberrys: Elegy Collection: Peonies
* Glitz Designs: Pretty in Pink: Stripe
Tattered Angels: Glimmer Mist; Crème de la Rouge
Seed Bead Mixture
Prima Marketing: Chalk Ink Pad: Rose Bud
Kaisercraft: Pearls
Bakers twine: pink
Scrapberrys: Cherry Blossoms: Bright Pink
Kaisercraft: Die: Words
Petaloo: Leaves
Purple flowers from my stash
Hobby House: paper roses
The Crafters Workshop: Stencil: Mini Harlequin
Prima Marketing: Finnabair: Texture paste crackle white


Thank you for stopping by today, I hope you will have a go at our challenges this month. Don't forget to pop over to the LGS blog to see what the other DT members created with this sketch.


Ginny   :)